Documentation
OCPP configuration
operating the cFos Power Brain Wallbox as an OCPP client on a backend
In the cFos Power Brain Wallbox, you must set the load management to "monitor" under the Charging Manager settings. Then click on the cogwheel in the wallbox tile to access the settings. There, scroll to the "OCPP gateway settings" area.
| OCPP gateway URL | The URL of the OCPP backend, e.g. ws://ocpp.backend.com/ for unencrypted connections or wss://ocpp.secure-backend.com/ for TLS-encrypted connections. For some backends, it is also necessary to specify a path, e.g. ws://ocpp.backend.com/path/to/resource/. |
| OCPP gateway password | If the backend operator specifies a password for the OCPP connection, this must be entered here. If the backend operator does not specify a password, this field can remain empty. |
| OCPP Gateway Client ID | The ID with which the gateway reports to the backend. This ID should usually be specified by the operator of the backend. Some backends identify their clients via individual keys that are part of the URL, e.g. ws://xyz123.backend.com/ or ws://ocpp.backend.com/xyz123/. In this case, the customer may be able to freely choose the client ID. |
Operating an OCPP wallbox with the cFos Charging Manager
To do this, click on "Settings" of the corresponding EVSE and enter the following:
| Device type | EVSE with OCPP 1.6 |
| Address | Here you must enter the ChargeBox ID that was configured in the wallbox. |
| Id | You must enter the connector ID here. For wallboxes with one charging point, this is always 1, for two charging points it is 1 or 2, etc. |
In the Charging Manager settings, select the option "Off" under "OCPP Server TLS" if no encrypted connections are to be accepted, "Detect" if both encrypted and unencrypted connections are to be accepted and "On" if only encrypted connections are to be accepted. Under "OCPP Server Port", select the TCP port on which the OCPP connections are to be accepted (default 19520). The OCPP server password is optional and must also be entered in the wallbox if it is specified.
In the wallbox, configure OCPP-1.6J as the protocol in the OCPP settings. Enter the IP address of the Charging Manager and the selected OCPP port as the server. This is usually preceded by ws://. For example, ws://192.168.178.42:19520/
The preceding ws:// indicates that the connection will be established unencrypted. This should usually be sufficient as long as the wallbox and cFos Charging Manager are in the same local network. However, if the connection is to be encrypted, wss:// should be used instead. Please ensure that your selection of ws:// or wss:// matches your selection of the "OCPP Server TLS" parameter (see above). For ws://, the "OCPP Server TLS" parameter must be set to "Off" or "Recognise", for wss:// it must be set to "On" or "Recognise".
The ChargeBox ID selected in the Charging Manager must also be entered in the wallbox. There are wallboxes where this cannot be freely selected, but is fixed and corresponds to the serial number of the box, for example. This must then be entered accordingly in the Charging Manager.
In some wallboxes, the port is entered in a separate field. For some devices, the ws:// can or must be omitted, for others it is mandatory. Most wallboxes must be restarted after the OCPP settings have been changed.
Delete loading profiles
The cFos Charging Manager uses OCPP to set charging profiles in a wallbox or charging station connected to it. The default profile states that charging is not permitted. Some charging stations save these charging profiles even after a reset. If such a charging station is to be operated at a later date without the cFos Charging Manager, the charging profiles there must first be deleted. This can be done with the cFos Charging Manager as follows
- Connect the charging station to the Charging Manager via OCPP. The identifier of the charging station must appear at the bottom of the corresponding tile in the Charging Manager.
- Select "Cancel charging current limit" in the Charging Manager under Settings \ Parameters \ For device deactivation and save the settings.
- In the Charging Manager, click on the green cogwheel on the tile that belongs to the charging station. Switch off the "Activated" switch in the top left-hand corner and save the settings. This will delete all charging profiles in the station.
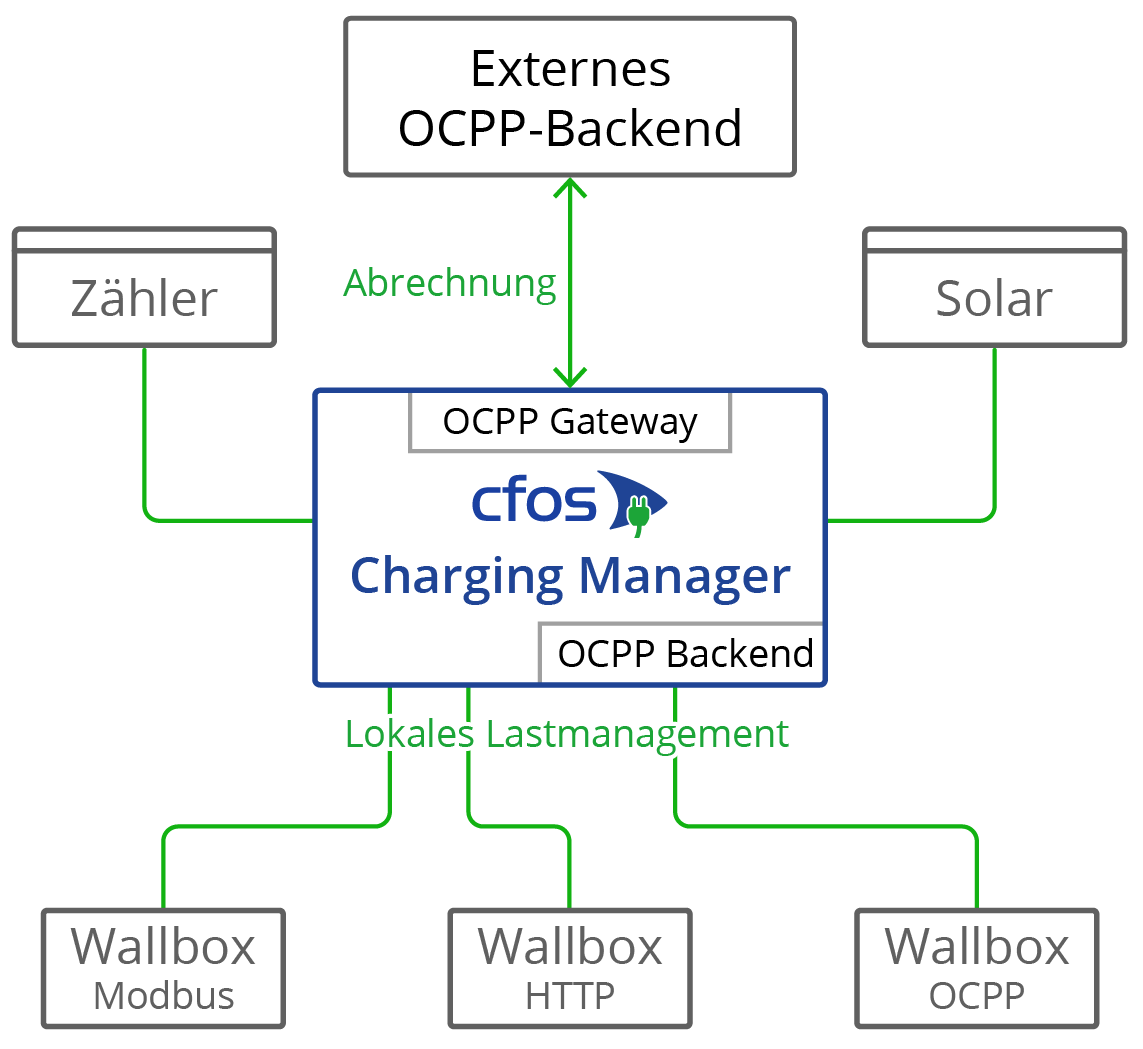
OCPP gateway in the cFos Charging Manager
It provides the backend with a standardised interface, regardless of what the specific wallbox can do. The wallbox only needs to be remotely controllable by the cFos Charging Manager, while OCPP support is not required.
If the wallbox supports OCPP, the cFos Charging Manager can compensate for some weaknesses compared to the backend. Functions of the OCPP gateway:
- Make a wallbox that cannot use OCPP appear to the backend as a wallbox with OCPP
- Control an OCPP-enabled wallbox that is logged into an external backend (e.g. for billing purposes) using OCPP in local load management
Some wallboxes with OCPP, such as the Innogy eBox professional S or Mennekes Amtron, can transmit meter data to the OCPP backend in compliance with calibration law. The OCPP gateway of the cFos Charging Manager can forward such meter data transparently to the backend.
Some wallboxes with OCPP can send Giro-E data from the EC card terminal to the backend. The cFos Charging Manager forwards this data transparently to the backend.
The gateway is not required to operate a cFos Power Brain Wallbox, as the cFos Power Brain Wallbox allows simultaneous operation of OCPP to the backend for authorisation and billing, as well as Modbus for load management. To do this, configure the OCPP client under "cFos Power Brain Configuration" and also activate Modbus. Then enter a cFos Power Brain Wallbox under "Start" and enter the address or COM port data and Modbus ID.
If you want to set up the gateway, you must configure the following parameters. To do this, click on "Settings" of the corresponding EVSE and enter the following:
| OCPP gateway URL | The URL of the OCPP accounting backend, e.g. ws://ocpp.backend.com/ for unencrypted connections or wss://ocpp.secure-backend.com/ for TLS-encrypted connections. For some backends, it is also necessary to specify a path, e.g. ws://ocpp.backend.com/path/to/resource/. |
| OCPP gateway password | If the backend operator specifies a password for the OCPP connection, this must be entered here. If the backend operator does not specify a password, this field can remain empty. |
| OCPP Gateway Client ID | The ID with which the gateway reports to the backend. This ID should usually be specified by the operator of the backend. Some backends identify their clients via individual keys that are part of the URL, e.g. ws://xyz123.backend.com/ or ws://ocpp.backend.com/xyz123/. In this case, the customer may be able to freely choose the client ID. |
Certificates for OCPP clients and servers
Certificates are used when using encrypted TLS connections between client and server. To successfully establish such a connection, the server always needs a certificate and an associated private key. The cFos Charging Manager already has a self-signed certificate on board. Therefore, no own certificates have to be imported. However, this option exists on both the server and the client side.
On the server side, you can import your own certificate and the corresponding private key. This certificate can be self-signed or signed by an official certificate authority (CA). If no CA certificate is stored in the client, a TLS connection is established in any case. If one or more CA certificates are stored in the client, the respective server certificates must match (OCPP Security Profile 2). The server certificate itself can be stored as the CA certificate. If the client has a connection to the Internet, root certificates from certification authorities that have signed the server certificate can also be stored there. However, you can also store your own root certificate that has signed the server certificate.
As an additional security level, a certificate can also be used in the opposite direction (OCPP Security Protocol 3). For this purpose, a certificate and the corresponding private key are stored in the client. Among the CA certificates, the server also receives this certificate or a root certificate that has signed the client certificate. This means that the TLS connection is only established if the server can also verify the client certificate.
You can create certificates yourself, e.g. with the programme OpenSSL, which is available free of charge for Windows and Linux. A few examples using OpenSSL follow. The examples use a configuration file saved in UTF8 format in conjunction with the -config parameter. This has the advantage that umlauts and other Unicode characters can also be used in the certificate. The configuration file always has the following format:
         [req]
         prompt = no
         distinguished_name = dn
         req_extensions = ext

         [dn]
         CN = Unsere Tiefgarage
         emailAddress = info@tiefgarage-koeln.de
         O = Tiefgarage Köln GmbH
         OU = Abteilung 13
         L = Köln
         C = DE

         [ext]
         subjectAltName = DNS:tiefgarage-koeln.de,DNS:*.tiefgarage-koeln.de
Creation of a private key rootCA.key for a root certificate:openssl genrsa -des3 -out rootCA.key 4096
Create a self-signed root certificate rootCA.crt using the private key rootCA.key created above and the configuration file rootCA.cnf (the parameter -days specifies how many days the certificate is valid for):openssl req -x509 -new -nodes -key rootCA.key -sha256 -days 365 -out rootCA.crt -config rootCA.cnf -utf8
Creation of a private key client.key for a client certificate:openssl genrsa -out client.key 2048
Create a Certificate Signing Request (CSR) client.csr for a client certificate using the private key client.key created above and the configuration file client.cnf:openssl req -new -key client.key -out client.csr -config client.cnf -utf8
Creation of a client certificate client1.crt, which is signed with the root certificate rootCA.crt above and the associated private key rootCA.key (the parameter -days again specifies how long the certificate is valid):openssl x509 -req -in client.csr -CA rootCA.crt -CAkey rootCA.key -CAcreateserial -out client.crt -days 365 -sha256
Parallel operation OCPP and Modbus
You can operate a cFos Power Brain Wallbox in parallel with Modbus and OCPP, e.g. to integrate it into local load management via Modbus and connect it to a billing backend via OCPP. To do this, "Enable Modbus" must be switched on in the settings of the cFos Power Brain Wallbox and a TCP port or COM parameter must be configured so that the wallbox can be addressed via Modbus. In addition, a URL to the OCPP backend, the OCPP client ID and, if applicable, the OCPP connector ID must be set under the OCPP settings. OCPP then starts loading processes, i.e. transactions. It therefore uses the transmitted RFID to determine whether the transaction is authorised and then starts loading if necessary. If no RFID reader is available, you can configure a fixed RFID that is known to the OCPP backend. The charging current can now be regulated by the load management via Modbus, i.e. the charging current specified by the OCPP charging profile can be reduced. The charging profile specifies the maximum charging current. The charging current is therefore always the minimum of the charging currents specified by Modbus and OCPP. Charging can also be temporarily deactivated and reactivated via Modbus or OCPP. Charging only takes place if both Modbus and OCPP backend allow charging.